Showing posts with label pizza. Show all posts

Pizza Sloppy Joes

Sunday, September 8, 2013


Some of you might not know this about me but I have a "day job." I spend my days working at a large University and as you can imagine this is a very busy time of the year for us.  That means when I get home from work I am exhausted.  Absolutely spent.  So,  quick dinners that take minimal time and effort are essential!  

This recipe fits the bill.  Quick, easy and loaded with veggies with tons of flavor.  I would stick this one in your back pocket for this coming school year. 
Start with chopping your veggies.  I used red onion, green and red peppers.  You could also toss in mushrooms, banana peppers, broccoli whatever you like on your pizza.
Toss a pound of ground beef in a large skillet on medium heat and season with salt and pepper.
Brown it up
Then add the pepperoni.  Let this cook for a few minutes
Pour in a jar of pizza sauce 
And let it bubble away for a few minutes while you work on the garlic toast
Place the frozen garlic toast in a large skillet on medium high heat.  Cook them for a few minutes on each side.  PS.  did you know you could cook garlic bread this way!? Me either until I lived with my friend Sam.  She always made garlic toast like this, genius!
Then add in the veggies
Give it a quick stir.  You might ask why I did this so late…well I wanted it to be like a real pizza where the veggies are still a bit crisp.
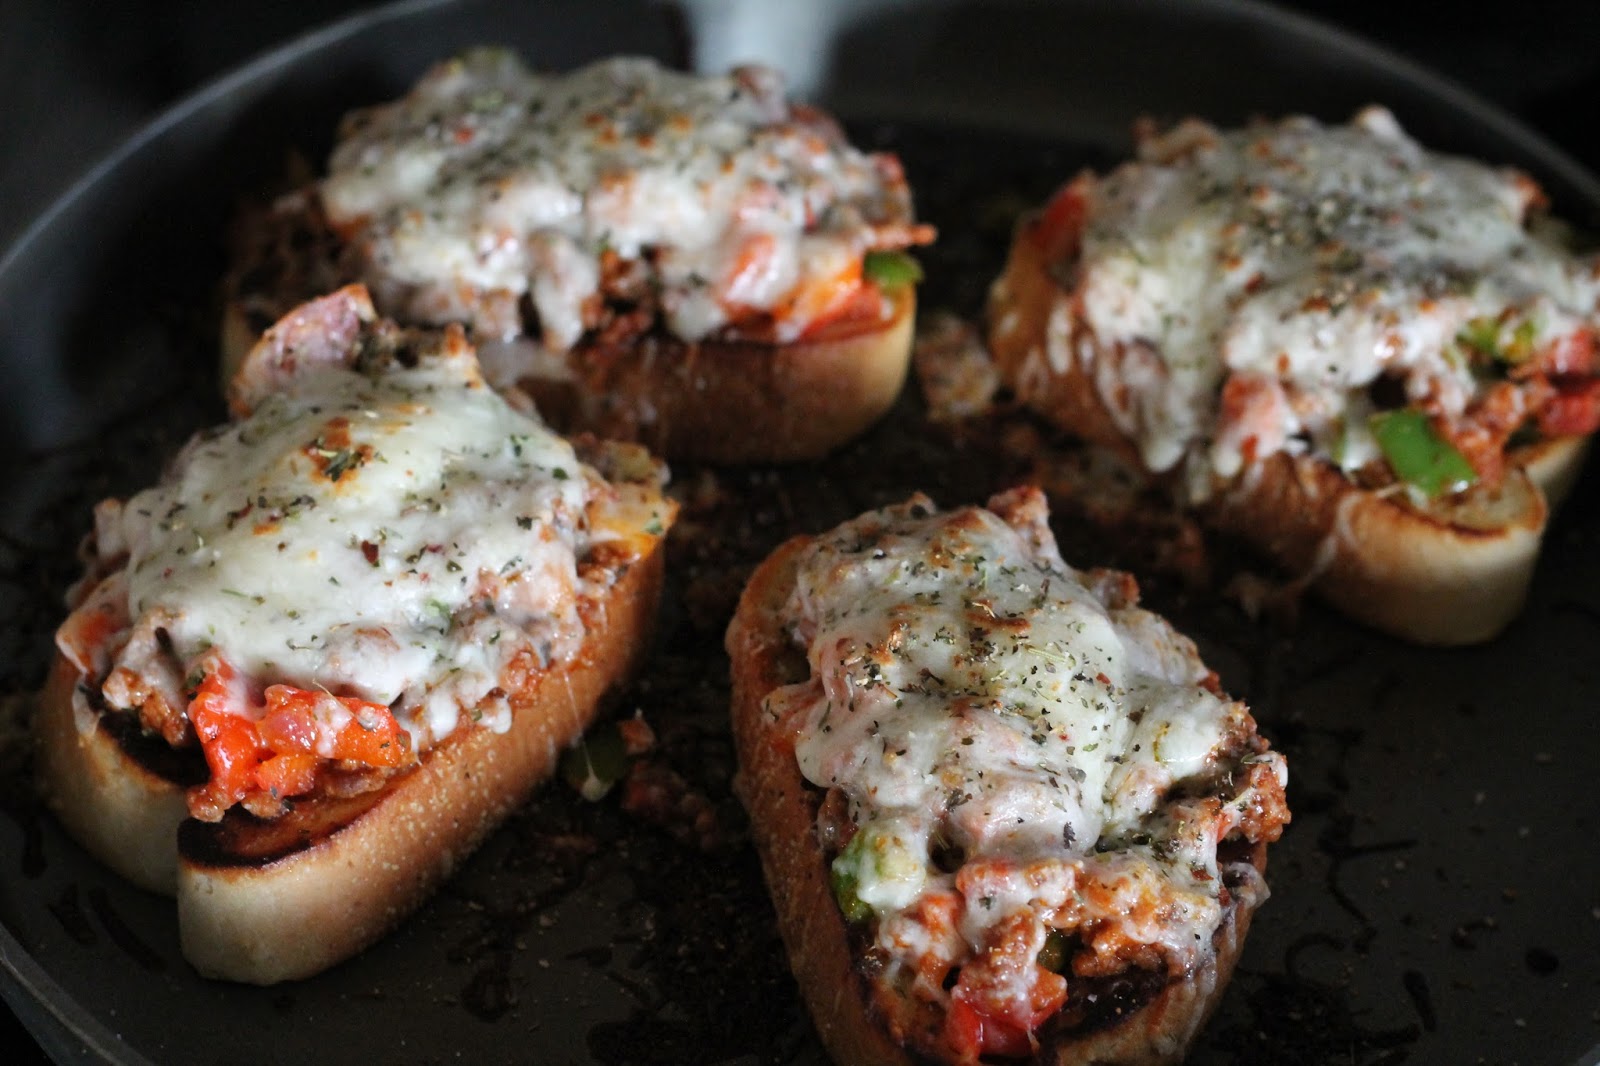
Anyway, spoon this delicious mixture onto each piece of the garlic toast
And top with a bunch of cheese and sprinkle with a little pizza seasoning.
Pop these in the oven under the broiler for just a few minutes
And there you have it!
Serve with a nice green salad


Pizza Sloppy Joes 
(serves 4--2 each) 

1/4 red onion, chopped
1/2 green pepper, chopped
1/2 red pepper, chopped
1 pound ground beef
salt and pepper for seasoning
1 cup chopped pepperoni
1 jar pizza sauce  
8 pieces of frozen garlic bread
2 cups shredded mozzarella
Pizza seasoning 

Start by placing the ground beef in a medium skillet on medium high heat.  Season with salt and pepper.  Cook until no longer pink.  Then add the pepperoni and cook for about 3 minutes or so.  If there is a lot of grease, at this point, drain the grease and discard.  Pour the pizza sauce into the skillet with the meat, stir to combine.  Add the veggies to the skillet and let simmer while you work on the garlic toast.  

Place a large skillet on medium high heat.  Add the frozen garlic toast to the pan and cook on each side for about two minutes.  

Once the garlic toast is cooked, spoon the veggie and meat mixture onto the toast.  Sprinkle with cheese and a little bit of the pizza seasoning.  

Place under the broiler to melt the cheese.  

Remove from the pan and enjoy!!! 

Recipe by: Mrs. Schwartz 


Pepperoni Pizza Rolls

Wednesday, August 1, 2012

You know, sometimes I have cravings.  No, I'm not pregs, sorry.  A lady can have a craving without being knocked up, geez.  Anyway, the other night I had a craving for pizza and I had half of this recipe sitting in my fridge.  But, we just had this awesome Mexican Breakfast Pizza so I didn't want to do the traditional thing. So I thought to myself, calzones?  Meh.  Stromboli? Meh.  Pizza Rolls....YES! Pizza Rolls.  And that my friends is how this recipe was born.  
Start by heavily flouring your working surface.
Roll out the dough.  To be honest with you, I would leave it a little thicker than this.  I like my rolls to be a bit more "bready" while Mr. Schwartz asked how I got them to be so wafer thin and like them.  So, you do what you like.
Line up those pepperonis.
And then this is just a little added somethin'....chive and onion cream cheese to be exact.  I really liked the flavor and texture this added but, if you don't have it in your fridge, don't worry, you can skip it.
Sprinkle with a bunch of mozzarella cheese.
And a dash of pizza seasoning.
Roll it up like you would cinnamon rolls...back and fourth from end to end until it is completely rolled.  Please note that this will be kinda tricky since the pepperoni slices are in there.  It could be a two person job if someone was around to help out.  Otherwise, I'm pretty sure you can handle it on your own--I did...while fighting off the dog who smelled pepperoni.  Is he at camp yet? Juuuust kidding...kinda.
See rolled.  Boom.
Slice it up also like you would cinnamon rolls. I used a serrated knife and it worked great, cutting through the pepperoni, cheese and dough.
Place them in a baking dish and into the oven they go.  These took about 15 at 375 but if you keep your dough thicker, it might take a bit more time.
Serve with pizza sauce and a nice salad.  
Move over Old Chicago....
I got this.


Pepperoni Pizza Rolls
Flour for dusting
1/2 of this recipe for Fail Proof Pizza Dough or your favorite pizza dough
40 (or so) pepperoni slices
2 tablespoons chive and onion cream cheese (optional)
2 cups shredded mozzarella cheese
1 tablespoon (or so) pizza seasoning
1 cup pizza sauce, for serving

Preheat the oven to 375 degrees.

Start by heavily flouring your working surface.  Place the dough in the middle and work it into a rectangle that is 16x14 or so.  Go a little bigger if you want less "bready" rolls and smaller if you want more "bready" rolls.  Lay the pepperoni out on the dough in rows.  Top the middle row of pepperoni with a dollop of the cream cheese.  Sprinkle the mozzarella cheese over all of it then sprinkle with pizza seasoning.

Roll up the dough like you would cinnamon rolls, going back and fourth trying to keep it as tight as you can.  Slice with a serrated knife about 2 inch sections.  Place into a greased 9x13 pan.  Bake for about 15 minutes.  Check to see if they are getting golden brown.  Pop them back in the oven if they don't look all the way done.  I also poked a few in the middle, if they don't spring back a little they need a few more minutes in the oven.

Serve with warm pizza sauce.

Recipe by: Mrs. Schwartz.  Pizza Dough from: Lauren's Latest. She rocks.


Mexican Breakfast Pizza

Monday, July 30, 2012

Ahhhh I can't stop making breakfast food.  But seriously, why would I stop?  Breakfast may be my favorite meal of the day--dinner coming in second then lunch for the bronze.  Breakfast should be first--it is the most important meal of the day, so they say.  

This breakfast pizza will knock your jammies off…if that's a good thing.  If it is, it will do that.  This zza is so good. I mean so good.  Pretty near perfection if I do say so.  Happy Monday, make some breakfast....or brinner. Even better. 
Start by cracking 6 eggs into a bowl. Season with a little s&p.
Whisk them together using a fork.
It's time to scramble.  Here is a little secret about scrambling eggs.  Low and slow baby.  I am well known for my scrambled eggs so trust me here.  I have been scrambin' eggs since I was knee high to a grasshopper.  I'm not kidding--ask my mom, I would stand on a chair and scramble eggs.  Honestly.  So, when I say low and slow, believe me.

Spray a large skillet with cooking spray and pour your eggs in.  The burner should be on medium heat and you will need to babysit.  Using a spatula, just keep scraping the bottom of the pan like so...
See, things are starting to thicken up.  Keep scraping...
Keep scraping...
Until you have the fluffiest eggs known to man.  You are welcome.  Set these bea-tee-ful eggs to the side....off the burner so they don't dry out.
Next you will need to roll out and place the dough on a flipped over jelly roll pan.  I added a bit of cornmeal because I love the texture it adds.
Spread some salsa on the dough.
Add those pretty eggs...
Pepper jack cheese...
And a few more of your favorite toppings...
I used precooked turkey sausage patties (these are the bomb).
Red and green peppers...
A bit of diced red onion...
And another sprinkle of cheddar jack cheese.
Ready to bake.
Holy mother.
Yep, what can I say?  This breakfast pizza is seriously divine.
It would be perfect for a brunch when you are entertaining...if you are into that sorta thing.
To guild the lilly, add more salsa on the top...
And Jimmy's Smokehouse Ranch Dip.  Holy Crap.  I mean seriously nothing better than this combination.
I'm not kidding.

Mexican Breakfast Pizza


6 large eggs + salt and pepper to taste
1/2 of Lauren's Latest Failproof Pizza Dough Recipe or your favorite pizza dough recipe
1 tablespoon or so cornmeal (optional but I love it!)
2/3 cup salsa + additional for serving
1 1/2 cups pepper jack cheese
6 turkey sausage patties, cooked
1/2 cup red or green (or both) peppers, diced
1/4 cup red onion, diced
1/2 cup cheddar jack cheese
Jimmy's Smokehouse Ranch Dip, for serving

Preheat the oven to 450 degrees.

Start by cracking the eggs into a bowl.  Season with a bit of salt and pepper.  Whisk together with a fork.  Preheat a large skillet on medium heat and spray with cooking spray.  Pour the eggs into the pan and scramble the eggs by slowly scraping the bottom of the pan.  Remove from the heat when no longer runny but not dry.  Set aside, off of the burner you cooked on.

Prepare the crust by using a rolling pin to make a large rectangle.  Add the cornmeal to the bottom of the pan and gently move the dough onto the pan.  Spread the salsa over the dough like you would with pizza sauce on a pizza.  Top with scrambled eggs, pepper jack cheese, turkey sausage, peppers, onions then with cheddar jack cheese.

Bake in the oven for 10 minutes.  After 10 minutes check on it...if the cheese is melted and it turns golden brown take it out.  If it needs a few more minutes just add a few at a time and keep your eye on it--the oven is at almost 500 degrees so it can turn from golden brown to burnt to heck quickly. : )

Cut into squares and top with salsa and Jimmy's Smokehouse Ranch Dip.  Enjoy!

**Cook's note:  Mr. Schwartz suggested that we cook the crust before adding all of the ingredients next time.  I have to say, it is a pretty good idea.  If you decide to do this, place the crust (just cornmeal and dough) in the oven for about 3-4 minutes in the 450 degree oven before topping with anything else.  After the 3-4 minutes, remove the crust and assemble as directed above.  You will take a few minutes off of the full 10 minutes cooking time because the crust will be half way done...I think.  Don't quote me on this as I haven't tried it but I think it would work!  Let me know if you try it! Over and out**

Recipe by: Mrs. Schwartz

Made With Love By The Dutch Lady Designs