Yes, that is the actual name of
these cakes by Little Debbie. These were a staple around various holidays in our house but my mom bought them
for sure for Valentine's day. My brother would scarf those babies down, one package at a time.
I saw them in the grocery store the other day and had them in my cart until it hit me. Umm, why don't I just waste 2 hours of my weekend trying to make them? Back on the shelf they went and into my cart went Crisco (vegetable shortening) and marshmallow fluff. Obviously I had 5 boxes of white cake mix in my pantry. I live with Mr. Schwartz you know. The king of white cake. A quick stop at Michael's for the candy melts and I was on my way to Little Debbie heaven.
I would change a few things and I will discuss them along the way. Why don't we just get started. Valentine's Day is only 6 days away!
Musical Selection: My Lovin' (Your Never Gonna Get it) by: EnVogue. Tonight, someone on tv said never going to get it and Mr. Schwartz and I totally broke into this song. I started with the never gonna get it and he actually did the high part of the break down. If you know this song, you know what I mean. I was once again reminded why I married my husband.
Okay, super easy. Make two white cake mixes according to the recipe on the back of the box. Eat half of the batter, forgetting everything your mom told you about eating raw eggs and make another box.
Next, spread the batter into 2 greased jelly pans. I use the Target brand cooking spray with flour in it. Doesn't it look weird? But it works like magic.
There you go. Two pans of cake batter ready for the oven. I baked them for about 30 minutes. Just until they are slightly golden brown and a toothpick inserted in the middle comes out clean. I did this the day before and covered them with Press and Seal after they were cooled. I figured they would turn out better if the cake was fresh but not super fresh and fully cooled. I think this part of my plan worked.
The next day, I started to work on the cream filling. Yes, there is a cream filling! Haven't you had one of these before. Geez. It starts with something I have never bought in my life: Crisco. Yep, I know it's baaaad for you but I wanted these to be authentic.
You will also need some marshmallow fluff.
And powdered sugar.
And vanilla. I stirred it up at this point.
And realized that I didn't have enough so I added more powdered sugar.
Then it was too thick and didn't taste like much. So I added some salt to water.
Poured it into the frosting and whipped it up. Much better. Arn't you happy I make recipes before you do? Set this aside…for now.
Cut out hearts from the cake.
Ready for assembly. Mine were nowhere near perfect and that was okay. Just lay them out on a wire cooling wrack.
Fill up a pastry or sandwich bag with the cream filling. I like to use a cup to keep the bag open. This frees up both of your hands and works like a charm.
Cut off one of the corners and squeeze the frosting onto the hearts.
Frosted.
Top with another heart to make a sandwich.
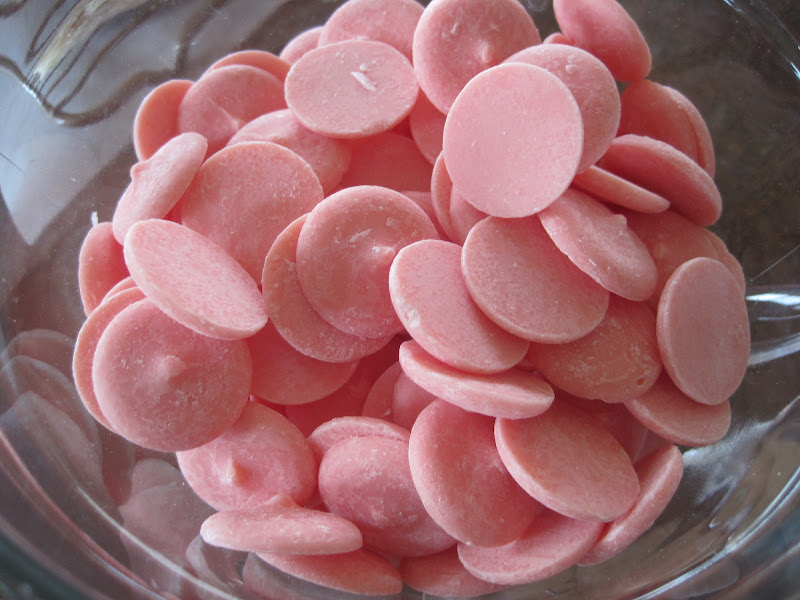
Then, work on the coating. You will need some of these
candy melts. I found them at Michael's Craft store but I'm sure they are on Amazon.com or other craft stores.
They are just so cute.
Okay, pop them into the microwave in 30 second intervals. The directions say otherwise but, I'm telling you. 30 seconds at a time on high and you are set. Just take them out every 30 seconds and give them a stir. The first one or two times they won't look like much but you must stir.
And stir, and put them back in.
Until there are no more lumps and it is nice and smooth.
Yeah, more Crisco. I wished I would have known how well this worked when I made
these cake pops!!! This is fantastic. The Crisco is solid so it makes a nice hard coating where the vegetable oil that I used in the
cake pops made them kind of greasy. Anyway, add a bit of Crisco (as in 1/4 cup or so) to the hot candy melts. Stir until it is completely combined.
At first I didn't add all of the Crisco and I had a difficult time with putting the coating on the cakes. The moment I added more it worked perfectly. More on this in a bit….
Nice and thinned out.
Method one. Take a tiny adorable spatula with a little of the coating and almost brush it onto the sides of the cake. This.was.miserable. But, it kinda worked.
See? Yes, they are not perfect. But, you can almost shave the excess/bumps off once it hardens if you are really careful.
Method two. After I thinned it out more with the Crisco I almost poured it on the top and allowed it to fall down the sides. I liked how this looked a little better. But it only went down to the second layer.
So after the top hardened I flipped it.
And did the other side. This worked better than the brushing method. However, I do think if you thin it enough, you can dip the sides into the coating then almost frost the top and bottom. I think that would work great. If you try that please let me know how it works!
For authenticity, I melted a bit of almond bark in the microwave using the same method as the candy melts. 30 seconds, stir. 30 seconds, stir. 30 seconds, stir.
Then a little drizzle on top. Yep, I'm bad at drizzling, I know.
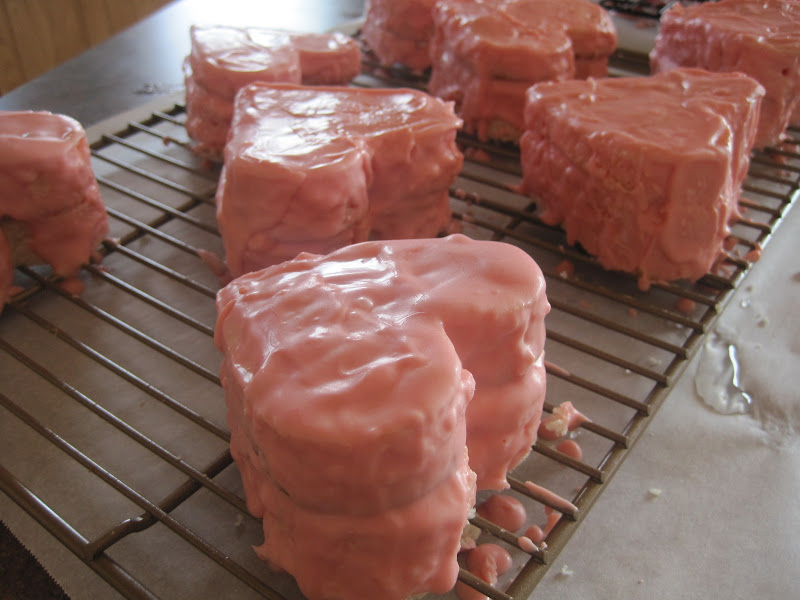
And there you have it.
The finished product. I left them out on the counter just like this since they were coated they didn't need to be covered over night.
Here is the finished product. The coating was a little thick but I think if you thin it out and use the dip method these could be pretty solid.
I brought them to the Super Bowl party we attended and they were a hit. We ended up cutting most of them in half and many brought them home for the next day. The only thing that wasn't authentic was the greasy film that is left on the roof of your mouth. I guess that's not a bad thing huh?
Enjoy! : )
Pin It
Be My Valentine Cakes
For the Cakes:
2 boxes white cake mix and ingredients to prepare the cakes (eggs, water, canola/vegetable oil)
For the Cream Filling:
1/2 cup vegetable shortening
1 7 oz tub/jar marshmallow fluff
2 cups powdered sugar
1/4 cup hot water
1/2 teaspoon salt
For the Coating
2 14 oz bags
candy melts
1/2 cup vegetable shortening
2 oz Almond bark
Preparation:
The night before, prepare cake batter as directed on the back of the box. I used the egg white only recipe. Pour the batter into two jelly roll pans that have been sprayed with cooking spray. Bake in a preheated 350 degree oven for about 30 minutes or until they are lightly golden brown and a toothpick comes out clean in the middle. Once fully cooled, cover with plastic wrap and set aside for the next day.
The next day, uncover the cake for an hour or so. I don't know if this is 100% necessary but I think it helped me. Cut out hearts of the cake with a cookie cutter. Place half of the hearts on a wire wrack.
Begin working on the cream filling. Combine 1/2 cup shortening, marshmallow fluff, powdered sugar and vanilla in a medium bowl using a hand mixer. Mix together hot water and salt. Add to the shortening mixture. Mix for 2 minutes or until completely combined and fluffy. The filling will be thick. Place in a pastry bag or sandwich bag.
Cut the corner off of the sandwich bag (if using) and pipe a tablespoon and a half or so of filling onto the hearts. Top with the second heart to make a sandwich. Press down gently.
Next, place one bag of the candy melts into a microwaveable bowl. Place the bowl in the microwave for 30 second on high. Take it out and stir. Place back into the microwave for 30 seconds again on high. Do this until the melts are completely melted. Add in 1/4 of a cup of shortening. Stir until the shortening is melted and combined into the candy melts. **Note: I did this twice (hence half of the ingredients) since the candy melts eventually harden as you are coating the cakes. It is easier to work in batches**
Dip or frost the cakes into the candy melts. After the cakes are coated, melt the almond bark the same way you melted the candy melts. You don't need any shortening to thin the almond bark. Using a spoon, drizzle the almond bark over the coated cake hearts.
Enjoy!
Recipe by: Mrs. Schwartz


wow! this is a nice idea for valentines! looks delicious
ReplyDeleteHi Arah! They are very tasty and perfect for Valentine's Day!
DeleteI'd say that took a lot of patience! Glad it was you & not me! Enjoy them : )
ReplyDeleteHi Monika! Yes, tons of patience! But, well worth it. I do think that dipping them is key. They were definitely enjoyed...only lasted a few hours!
DeleteI hope you will join my Famous Linkz Party tomorrow (Wed). I so loved what you shared last week!!
ReplyDelete-Heather
@ www.made-famous-by.com
Hi Heather! I absolutely will join your Famous Linkz Party today!! Thanks for asking me! : )
DeleteHow cute! What a great idea :) I just pinned this so I'l remember to try and come up with a gluten free version!!
ReplyDeleteAbsolutely! Let me know if you figure it out and send me an email/comment letting me know you did!
DeleteOh, how I love these!! They look great and I bet they taste amazing!! Little Debbie's are the BEST!! Thanks for sharing this...going to give it a try when I feel brave. :)
ReplyDeleteDebbie, the homemade version is even better than the ones you buy in the store! Feel brave, you won't be disappointed : )
DeleteOh, wow, I can't believe I am finding this recipe, just today I was eating a Little Debbie snack cake (the very one that you are replicating here in fact) and thought I am sure I can make these myself! Thanks for showing me that yes, I can make these! http://www.thejohnslife.com/BabycakesBlog
ReplyDeleteTina, too funny! What are the chances?! You can totally make them!
DeleteThese puppies are still makin' me drool! You were the most viewed link at my Famous Linkz Party last week so your recipe will be featured in my post next week. Yippie!!
ReplyDelete-Heather
@ www.made-famous-by.com
Ha, they are pretty fantastic! I'm SO excited that my link was the most viewed this week! Thanks for having me again!
DeleteI loved discovering your recipe on Pinterest!!! I didn't have enough time to make them this year for Valentine's Day but I hope to carve out some time for an excuse to make them soon.
ReplyDeleteThank you so much for such great pictures to help with the step by step process!
Avril, they really would be great any time of year! Maybe you could find a shamrock cookie cutter and use green candy melts! That would be pretty cute too! They are definitely a must try.
DeleteYUMMY! I agree with all the comments that these look FABULOUS! Thanks for sharing at Dwell on Fridays! Come by again tomorrow to link up some new projects! P.S. Is that Mumford and Sons playing on your site - if so...I LOVE THEM and blare them in my kitchen all the time :) Great minds think alike :)
ReplyDeleteHi Sarah! Thanks for stopping by! It sure is Mumford and Sons!!!! I love to listen to them while I'm cooking!!!! Have a nice weekend! : )
Delete